Custom-built keyboard
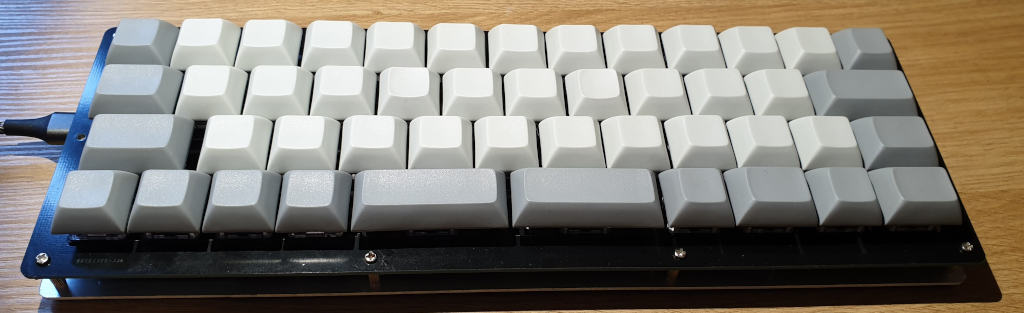
I’m typing this post on a keyboard I made myself, and I’m rather excited about it!
Why make my own keyboard?
- I wanted to learn a little bit about practical electronics, and I like to learn by doing
- I wanted to have the feeling of making something useful with my own hands
- I actually need a small, keyboard with good-quality switches now that I travel a fair bit for work and this lets me completely customise it to my needs
- Just because!
While it is possible to make a keyboard completely from scratch, it makes much more sense to put together some premade parts. The parts you need are:
- PCB (printed circuit board): the backbone of the keyboard, to which all the other electrical components attach, this defines the possible physical locations for each key
- Switches: one for each key to complete a circuit whenever you press it
- Keycaps: switches are pretty ugly and pretty uncomfortable to press, so each one gets a cap; these are what you probably think of as the “keys” on your keyboard and come in almost limitless variety of designs (within the obvious size limitation) and are the easiest bit of personalisation
- Controller: the clever bit, which detects open and closed switches on the PCB and tells your computer what keys you pressed via a USB cable
- Firmware: the program that runs on the controller starts off as source code like any other program, and altering this can make the keyboard behave in loads of different ways, from different layouts to multiple layers accessed by holding a particular key, to macros and even emulating a mouse!
In my case, I’ve gone for the following:
- PCB
- Laplace from keeb.io, a very compact 47-key (“40%”) board, with no number pad, function keys or number row, but a lot of flexibility for key placement on the bottom row. One of my key design goals was small size so I can just pop it in my bag and have on my lap on the train.
- Controller
- Elite-C, designed specifically for keyboard builds to be physically compatible with the cheaper Pro Micro, with a more-robust USB port (the Pro Micro’s has a tendency to snap off), and made easier to program with a built-in reset button and better bootloader.
- Switches
- Gateron Black: Gateron is one of a number of manufacturers of mechanical switches compatible with the popular Cherry range. The black switch is linear (no click or bump at the activation point) and slightly heavier sprung than the more common red. Cherry also make a black switch but the Gateron version is slightly lighter and having tested a few I found them smoother too. My key goal here was to reduce noise, as the stronger spring will help me type accurately without hitting the bottom of the keystroke with an audible sound.
- Keycaps
- Blank grey PBT in DSA profile: this keyboard layout has a lot of non-standard sized keys, so blank keycaps meant that I wouldn’t be putting lots of keys out of their usual position; they’re also relatively cheap, fairly classy IMHO and a good placeholder until I end up getting some really cool caps on a group buy or something; oh, and it minimises the chance of someone else trying the keyboard and getting freaked out by the layout…
- Firmware
- QMK (Quantum Mechanical Keyboard), with a work-in-progress layout, based on Dvorak. QMK has a lot of features and allows you to fully program each and every key, with multiple layers accessed through several different routes. Because there are so few keys on this board, I’ll need to make good use of layers to make all the keys on a usual keyboard available. Dvorak Simplified Keyboard
I’m grateful to the folks of the Leeds Hack Space, especially Nav & Mark who patiently coached me in various soldering techniques and good practice, but also everyone else who were so friendly and welcoming and interested in my project.
I’m really pleased with the result, which is small, light and fully customisable. Playing with QMK firmware features will keep me occupied for quite a while! This isn’t the end though, as I’ll need a case to keep the dust out. I’m hoping to be able to 3D print this or mill it from wood with a CNC mill, for which I’ll need to head back to the Hack Space!
Webmentions
You can respond to this post, "Custom-built keyboard", by:
liking, boosting or replying to a tweet or toot that mentions it; or
sending a webmention from your own site to https://erambler.co.uk/blog/custom-built-keyboard/
Comments
Powered by Cactus Comments 🌵